Web Widget Integration and Setup
Documentation for integrating the "Oohdesk, web widget" service
Application Code
| Platform | Link |
|---|---|
| Linux | Download zip archive (updated 09.09.2025, relevant as of 09.04.2026): https://drive.google.com/file/d/1Nre-Z8RnjJnO8QtUUmpQFaKPZ2cPBdls/view?usp=sharing |
| Windows | Download msi file (updated 09.04.2026, relevant as of 09.04.2026): https://drive.google.com/file/d/1oFdg5dHQM35hPVOxHS2ygrUbG5tuiEtT/view?usp=sharing (version without script for PIN code entry – download separately if needed) |
Launch
Step 1: Open the folder with the application archive.
At first launch, specify a link to your CMS. This link will be written to the application config. Subsequent launches can be done without this parameter.
The application has auto-start on system boot for all operating systems.
--entrypoint is one way to specify configs; others are described in the Configs section.
| OS | Instructions |
|---|---|
| Linux | Open a terminal in the root of the downloaded folder (the application is ready). Run the application for the first time: ./backend --entrypoint="https://indoor.simb-ad.com"Run the application again: ./backend |
| Windows | Run the downloaded msi file. It unpacks to: This PC > Local Disk (C:) > Users > [User] > AppData > Local > Oohdesk web widgetNavigate to: app-[version] > resources > app > backendAlways launch from this path thereafter. Open a terminal in this folder. Run the application for the first time: ./backend.exe --entrypoint="https://indoor.simb-ad.com"Run the application again: ./backend.exe |
Step 2: Open the application in a browser.
Default address: http://localhost:1080 (can be changed in configs, see the Configs section).
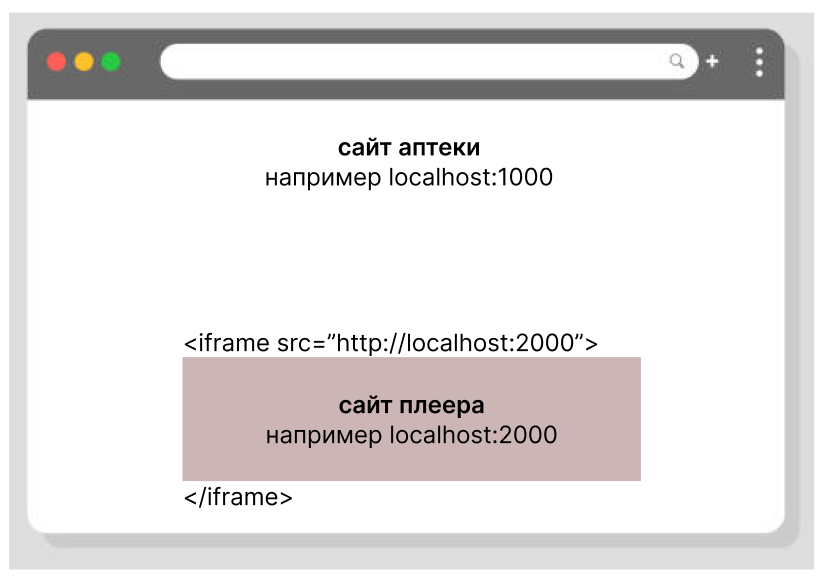
It is better to open not localhost:1080, but the file oohdesk-web-widget_EXAMPLE.html, which simulates your application environment – a site with an iframe player.
Download oohdesk-web-widget_EXAMPLE.html:
https://drive.google.com/file/d/1fIFAFkrSuYRVkFrBygllscj-HBy2yhVg/view?usp=sharing

Application launch, console
HTML file emulating two iframe instances
Activating the Player via Shell Script
This is activation via a script (through the console). Activation via the interface (+ about PIN code) is described below in the Activating the Player via Interface section.
Step 1. Take the file from the root of the downloaded application archive OR download the file:
| OS | Link |
|---|---|
| Linux | https://drive.google.com/file/d/1qf2YueVeSQihBCLNw9B7sSOk0fn7L79o/view?usp=sharing |
| Windows | If you have PowerShell or CMD: https://drive.google.com/file/d/12eOU6BhprBhQ3SdOMwWy0XNpeJsTQnkU/view?usp=sharing If you have Git Bash: Download the sh file for Linux |
Step 2. Run (the script can be anywhere):
PIN-CODE– PIN code without spacesENTRYPOINT– link to the CMS site you are using
| OS | Command |
|---|---|
| Linux (or Git Bash on Windows) | ./activate-pin-v1.sh <PIN-CODE> [ENTRYPOINT]For example: ./activate-pin-v1.sh 8142330100 https://indoor.simb-ad.com |
| Windows | ./activate-pin-v1.bat <PIN-CODE> [ENTRYPOINT]For example: ./activate-pin-v1.bat 8142330100 https://indoor.simb-ad.com |

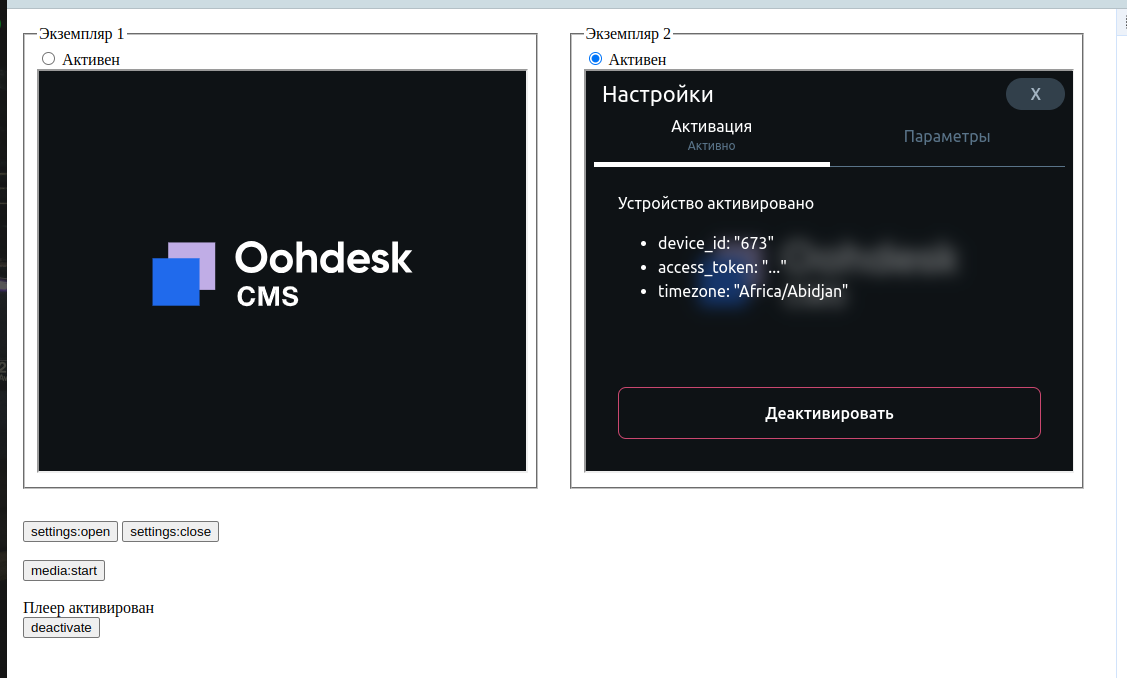
Successful activation
It is not necessary to run the application beforehand; you can activate first and then launch.
It's fine if you have already run the application – you can run the script at any time as many times as you like. Just restart ./backend (or ./backend.exe) afterwards for the settings to apply.
Closing the Application
In the console where the application is running – press Ctrl+C. You can also safely close the browser.
Configuration
You can change the application config to suit your needs. By default, the configuration is stored inside the application, but you can create your own. To do this, create a file at:
~/.config/oohdesk-web-widget/config.json
And fill it with the minimal template (these are mandatory parameters).
(Fields highlighted in green can be changed. It's best not to touch the rest – they will be filled in by the application itself)
{
  "config": {
    "entrypoint": "https://indoor.simb-ad.com",
    "appData": "~/.config/oohdesk-web-widget",
    "frontDir": "dist"
  },
  "AppPort": "1080"
}
Each time you change the config, you need to restart the application (./backend or ./backend.exe) for the changes to take effect.
All settings that can be specified in the config.json file:
{
  "rebootId": 0,
  "config": {
    "entrypoint": "https://indoor.simb-ad.com",
    "appData": "/home/spanri/.config/oohdesk-web-widget",
    "frontDir": "dist"
  },
  "v": null,
  "activate": { … },
  "frontData": {
    "splashImageNotActivatedSrc": "...",
    "splashImageNoContentSrc": "..."
  },
  "VerboseConsole": true,
  "AppPort": "1080"
}
-
config.entrypoint – Link to the CMS site you are using.
-
frontData.splashImageNotActivatedSrc – Image shown when the player is not activated. By default, a gray Oohdesk logo is shown. You can replace it with your own.
Note: this is a browser, you cannot load links like
file:///home/user/…. Any formats suitable for the<img>tag are accepted. -
frontData.splashImageNoContentSrc – Image shown when the player is activated but there is no content or fillers (e.g., no campaign in CMS, content not yet loaded, something is broken). By default, a color Oohdesk logo is shown.
-
VerboseConsole – If
true, detailed operation logs are shown in the console. -
AppPort – The port on which the application runs – both backend and frontend. For example, if port 1080 is already in use, you can specify any other convenient port.
Settings
How to open: In the player application in the browser, click 4 times with the left mouse button anywhere on the player.
Here you will find activation and some parameters (for convenient viewing and management). You can use this interface or control via postMessage.
Player interface settings
iframe ↔ Parent Site Communication
You can study the interaction using the oohdesk-web-widget_EXAMPLE.html file – all interaction options are implemented there.
Communication is done via postMessage. For example:
widget.postMessage({ type: "activate", payload: { … } }, "*");
Available message types (your site → player via widget.postMessage):
| Type | payload | Description |
|---|---|---|
activate | pin_code – PIN code from CMS for device activation | Activate the device without using the interface. Additionally, a third parameter messageId is sent in postMessage, allowing you to catch the result of the activation (see activate:success and activate:error). |
deactivate | Deactivate the device (unlink from the CMS site). | |
settings:open | Open the settings screen (instead of clicking 4 times). | |
settings:close | Close the settings screen. | |
media:start | After the browser starts, content is not shown. You need to send this signal to start playback. Shows one ad atom. If a campaign with “Block” mode is created in CMS (e.g., set to 10 sec), then 1 atom = 10 sec. If content is already playing – nothing happens, it will continue playing the current content. | |
media:interrupt | Signal for abrupt playback stop (e.g., when you need to switch the player view from fullscreen to small widget). In this case, the content will be considered not played and will start playing again at the next media:start signal. If nothing is playing and you send this signal – nothing happens. |
Available types of received messages (player → your site, your site listens via window.addEventListener):
| Type | payload | Description |
|---|---|---|
activate:success | (response) => void | Response for activate when successful. |
activate:error | (errorMessage: Error) => void | Response for activate when activation fails, error. |
widget:status | is_player_activated – boolean, whether the player is activated with a PIN code;is_media_playing – boolean, whether any content from CMS is currently playing (even if it's a filler) | General widget status. Whenever something changes, the player sends this signal. |
media:end | media – object with the media content that finished playing | The player has finished playing an ad atom and sends this signal. |
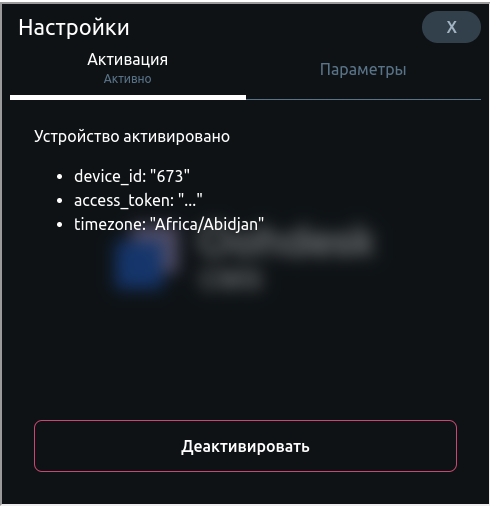
Activating the Player via Interface
A player is created in CMS. After creation, the player receives a PIN code.
This PIN code is entered on the activation screen (in settings). If activation is successful, is_player_activated will be true, and a splash screen will be displayed.
The PIN code is one-time! After activation, it cannot be used again.
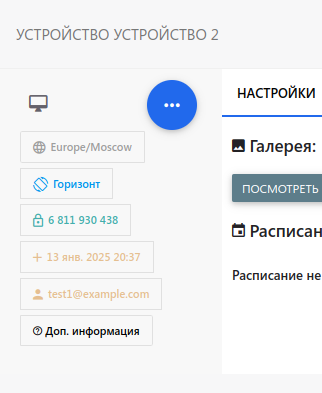
When a device is deactivated on the player, it is not deactivated in CMS – it will simply show as red in CMS. To generate a new PIN code in CMS, you need to deactivate the device (three dots → Deactivate). After that, a new PIN code will appear for generation.
Example of a deactivated player in CMS
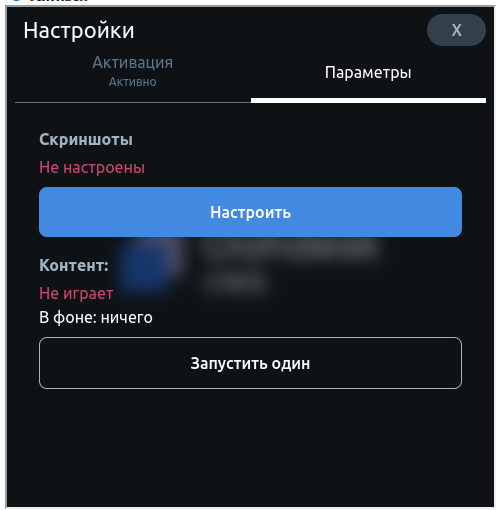
Screenshots
CMS has device management. One of the functions is to request a screenshot (if the device has internet access).
As of version 14.07.2025, screenshots cannot yet be taken from CMS (but you can experiment with their configuration).
In a browser, you cannot grant screen access once and for all – you need to grant it every time the page is refreshed, like in Google Meet. Therefore, the settings contain data about whether screenshots are currently configured. If not configured, click the "Configure" button, and the browser will ask which window to share (e.g., a browser tab or the entire display screen).
Content Management
Content – any files from CMS (including from SSP if VAST is configured). From CMS – images, video, HTML. From VAST – any content allowed by VAST technology (currently only MP4 is supported).
When content (if any) is downloaded from CMS, it will start playing on the screen. At that moment, is_media_playing will be true.
Content (ads, fillers) is downloaded automatically when internet access becomes available. All management is done through CMS.